Simple Text Chat App using Firebase in Swift 5
A straightforward way to develop a text messaging app using firebase firestore, auth, and MessageKit in Swift 5. One-to-One or group chat in the simplest way possible.
Updated: May 26, 2021: I updated the code based on the latest version of the message kit and iOS. It’s working fine. I’ve also added more instructions on how to use this same code for group chat. Feel free to leave a response if you get stuck at some point.
The Product:

The idea is simple. People can send text messages to each other!
Pods and Authentication:
Install the following pods:
pod 'GoogleSignIn'
pod 'Firebase/Core'
pod 'Firebase/Auth'
pod 'MessageKit'
pod 'Firebase/Firestore'
pod 'SDWebImage'
Auth:
The reason why there is GoogleSignIn in pods, is because I’ll be using it as Auth for this chat. So it is of HIGH IMPORTANCE!!! that you implement Auth using Google Sign:
This tutorial is only focused on implementing Chat.
Creating Base Classes and Firebase Structure:
We will create three classes in this section:
- ChatViewController.swift
Which will be a subclass of MessagesViewController of MessageKit - Message.swift
- Chat.swift
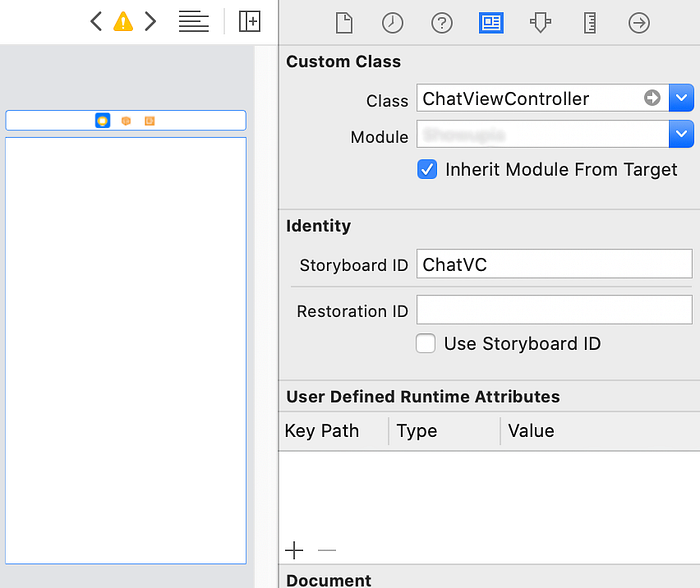
Create a new file named ChatViewController and in subclass add MessagesViewController.

MessagesViewController is a subclass in MessageKit and upon installing its pod you’ll automatically get it but if not manually write the name and then import MessageKit in the ChatViewController Class.
Add a ViewController in your storyboard and assign in ChatViewController.swiftclass you have just added.
Create three empty swift classes name Chat, ChatUser, and, Message which we’ll use as a modal for our chat.


Firebase Structure:
Our firebase structure will be:
|- Chats (Collection)
| — AutoID (Document)
| —- users (Field {Array})
| —- thread(Collection)
| — — AutoID (Document)
| — —- content (Field {String})
| — —- created (Field {DateTime})
| — —- id (Field {String})
| — —- senderID (Field {String})
| — —- senderName (Field {String})
Chats is the name of the collection that’ll have auto-id documents containing an array of users in that chat and a collection named thread which will have all the messages of that chat. In a thread there will be auto-id documents and each document will have one message with information like content of the message, when it was created, a random ID just to differentiate duplication of messages, the id of the person who has sent it in senderID and senderName contains the name of the person who has sent it.
Information from GoogleSignIn:
When you authenticate a user using GoogleSignIn, you get access to some of their information from which we’ll use the following:
- User Display name (Which we’ll use as
senderName) - User UID (The unique id of the user which we’ll use to differentiate different users i.e.
senderID) - User Photo (We’ll use it to show as the avatar of user sending message)
Let’s begin coding:
Open Chat.swift file. This is the file we will use to store the chat object. As per the firebase structure mentioned in the above section, a chat object consists of a collection and an array.
In the blank class Chat.swift made a struct with two variables:
struct Chat {var users: [String]var dictionary: [String: Any] {return ["users": users] }}
We are not looking at the collection thread as it’ll be fetched separately. So in this class, we have a variable called users which is a String array and a variable named dictionary which is returning a dictionary of the chat object i.e. users array.
After the struct create an extension of Chat class in which we will add the initializer of this class.
extension Chat {init?(dictionary: [String:Any]) {guard let chatUsers = dictionary["users"] as? [String] else {return nil}self.init(users: chatUsers)}}
In the init method we have first added a guard to make sure it's not nil and then simply initialized the class with the users.
That’s it for this class.
Next, open ChatUser.swift and add the following code to it
import Foundationimport MessageKitstruct ChatUser: SenderType, Equatable {var senderId: Stringvar displayName: String}
We need SenderType as per the latest MessageKit update (25 May 2021).
Now open Message.swift and after import UIKitadd these two additional imports:
import Firebase
import MessageKit
Referring back to our structure of firebase. A Message will contain one document of thread collection and a thread document has fields i.e. content, created etc.
We’ll do the same as we did with Chat.swift we create a struct:
struct Message {var id: Stringvar content: Stringvar created: Timestampvar senderID: Stringvar senderName: Stringvar dictionary: [String: Any] {return ["id": id,"content": content,"created": created,"senderID": senderID,"senderName":senderName] }}
All the variables and a dictionary that return all of these values.
Next, we’ll add an extension to Message where we’ll initialize it the same way we did with Chat.swift
extension Message {init?(dictionary: [String: Any]) {guard let id = dictionary["id"] as? String,let content = dictionary["content"] as? String,let created = dictionary["created"] as? Timestamp,let senderID = dictionary["senderID"] as? String,let senderName = dictionary["senderName"] as? Stringelse {return nil}self.init(id: id, content: content, created: created, senderID: senderID, senderName:senderName) }}
MessageKit requires implementation of MessageType as it is required to tell the message kit what type of chat we are implementing. In our case, we are just implementing a text-based chat. So in order to handle that we’ll add another extension of Message class as:
extension Message: MessageType {var sender: SenderType {return ChatUser(senderId: senderID, displayName: senderName)}var messageId: String {return id}var sentDate: Date {return created.dateValue()}var kind: MessageKind {return .text(content)}}
A SenderType helps MessageKit understanding who the sender of this message is. It also helps to identify which side of the screen the message will display meaning if you are sending a message it should show on left and the message you are receiving should be on the right side.
A messageId is just a unique id to differentiate one message from another.
sentDate helps display messages in order.
kind helps MessageKit understand what type of messages are being sent. I have only identified .text as we are only handling text messages for now.
That’s it for Message.swift class.
Finally the main class ChatViewController. When you are chatting this is the screen that will handle all the incoming and outgoing messages. Make sure you have the information of the person you are chatting with. I’m referring to you as currentUser and the person you are chatting with as User2.
So you need user2 name (user2.displayName), user 2 image URL (user2.photoURL) and user 2 UID (user2.uid). You can fetch this from GoogleSignIn authentication. Comment if you haven’t been able to do this.
So, let’s start coding by importing:
import InputBarAccessoryViewimport FirebaseFirestoreimport FirebaseAuthimport MessageKitimport SDWebImage
Next, extend ChatViewController: MessagesViewCOntroller with:
InputBarAccessoryViewDelegate, MessagesDataSource, MessagesLayoutDelegate, MessagesDisplayDelegate
Declare variables we’ll need in this class:
var currentUser: User = Auth.auth().currentUser!
private var docReference: DocumentReference?
var messages: [Message] = []//I'll send the profile of user 2 from previous class from which //I'm navigating to chat view. So make sure you have the following //three variables information when you are on this class.var user2Name: String?
var user2ImgUrl: String?
var user2UID: String?
Let’s first make a function called loadChat() which will do the following:
- Create a new Chat if there is no chat available between users.
- Load the chat if chat is available for users
func loadChat() {
//Fetch all the chats which has current user in it
let db = Firestore.firestore().collection("Chats").whereField("users", arrayContains: Auth.auth().currentUser?.uid ?? "Not Found User 1")
db.getDocuments { (chatQuerySnap, error) inif let error = error {print("Error: \(error)")return} else {//Count the no. of documents returnedguard let queryCount = chatQuerySnap?.documents.count else {return}if queryCount == 0 {//If documents count is zero that means there is no chat available and we need to create a new instanceself.createNewChat()}else if queryCount >= 1 {//Chat(s) found for currentUserfor doc in chatQuerySnap!.documents {let chat = Chat(dictionary: doc.data())//Get the chat which has user2 idif (chat?.users.contains(self.user2UID ?? "ID Not Found")) == true {self.docReference = doc.reference//fetch it's thread collectiondoc.reference.collection("thread").order(by: "created", descending: false).addSnapshotListener(includeMetadataChanges: true, listener: { (threadQuery, error) inif let error = error {print("Error: \(error)")return} else {self.messages.removeAll()for message in threadQuery!.documents {let msg = Message(dictionary: message.data())self.messages.append(msg!)print("Data: \(msg?.content ?? "No message found")")}//We'll edit viewDidload below which will solve the error self.messagesCollectionView.reloadData()self.messagesCollectionView.scrollToLastItem(at: .bottom, animated: true)}})return} //end of if} //end of forself.createNewChat()} else {print("Let's hope this error never prints!")}}}}
Next create the function called createNewChat() which will be called if the chat is not available for a user:
func createNewChat() {let users = [self.currentUser.uid, self.user2UID]let data: [String: Any] = ["users":users]let db = Firestore.firestore().collection("Chats")db.addDocument(data: data) { (error) inif let error = error {print("Unable to create chat! \(error)")return} else {self.loadChat()}}}
Now we’ll implement two functions to insert a new message in the feed and the second is to save that message on firestore:
private func insertNewMessage(_ message: Message) {//add the message to the messages array and reload itmessages.append(message)messagesCollectionView.reloadData()DispatchQueue.main.async {self.messagesCollectionView.scrollToLastItem(at: .bottom, animated: true)}}private func save(_ message: Message) {//Preparing the data as per our firestore collectionlet data: [String: Any] = ["content": message.content,"created": message.created,"id": message.id,"senderID": message.senderID,"senderName": message.senderName]//Writing it to the thread using the saved document reference we saved in load chat functiondocReference?.collection("thread").addDocument(data: data, completion: { (error) inif let error = error {print("Error Sending message: \(error)")return}self.messagesCollectionView.scrollToLastItem(at: .bottom, animated: true)})}
That’s it! All left to do now is to implement the required delegate methods.
First, we’ll implement InputBarAccessoryViewDelegate methods:
func inputBar(_ inputBar: InputBarAccessoryView, didPressSendButtonWith text: String) {//When use press send button this method is called.let message = Message(id: UUID().uuidString, content: text, created: Timestamp(), senderID: currentUser.uid, senderName: currentUser.displayName!)
//calling function to insert and save messageinsertNewMessage(message)save(message)//clearing input fieldinputBar.inputTextView.text = ""messagesCollectionView.reloadData()
messagesCollectionView.scrollToLastItem(at: .bottom, animated: true)// messagesCollectionView.scrollToBottom(animated: true)}
As you can see almost all of the things regarding UI of chat is handled by MessageKit like inputTextView.
Next, we are implementing MessagesDataSource methods:
//This method return the current sender ID and namefunc currentSender() -> SenderType {return ChatUser(senderId: Auth.auth().currentUser!.uid, displayName: (Auth.auth().currentUser?.displayName)!)// return Sender(id: Auth.auth().currentUser!.uid, displayName: Auth.auth().currentUser?.displayName ?? "Name not found")}//This return the MessageType which we have defined to be text in Messages.swiftfunc messageForItem(at indexPath: IndexPath, in messagesCollectionView: MessagesCollectionView) -> MessageType {return messages[indexPath.section]}//Return the total number of messagesfunc numberOfSections(in messagesCollectionView: MessagesCollectionView) -> Int {if messages.count == 0 {print("There are no messages")return 0} else {return messages.count}}
Next up is MessagesLayoutDelegate in which you can set the layout of how the chat will look like.
// We want the default avatar size. This method handles the size of the avatar of user that'll be displayed with messagefunc avatarSize(for message: MessageType, at indexPath: IndexPath, in messagesCollectionView: MessagesCollectionView) -> CGSize {return .zero}//Explore this delegate to see more functions that you can implement but for the purpose of this tutorial I've just implemented one function.
The last one is MessagesDisplayDelegate this will shape the message bubble.
//Background colors of the bubblesfunc backgroundColor(for message: MessageType, at indexPath: IndexPath, in messagesCollectionView: MessagesCollectionView) -> UIColor {return isFromCurrentSender(message: message) ? .blue: .lightGray}//THis function shows the avatarfunc configureAvatarView(_ avatarView: AvatarView, for message: MessageType, at indexPath: IndexPath, in messagesCollectionView: MessagesCollectionView) {//If it's current user show current user photo.if message.sender.senderId == currentUser.uid {SDWebImageManager.shared.loadImage(with: currentUser.photoURL, options: .highPriority, progress: nil) { (image, data, error, cacheType, isFinished, imageUrl) inavatarView.image = image}} else {SDWebImageManager.shared.loadImage(with: URL(string: user2ImgUrl!), options: .highPriority, progress: nil) { (image, data, error, cacheType, isFinished, imageUrl) inavatarView.image = image}}}//Styling the bubble to have a tailfunc messageStyle(for message: MessageType, at indexPath: IndexPath, in messagesCollectionView: MessagesCollectionView) -> MessageStyle {let corner: MessageStyle.TailCorner = isFromCurrentSender(message: message) ? .bottomRight: .bottomLeftreturn .bubbleTail(corner, .curved)}
Believe it or not, you have just implemented chat. So now just connect the delegates in viewDidLoad() of ChatViewController.swift:
self.title = user2Name ?? "Chat"navigationItem.largeTitleDisplayMode = .nevermaintainPositionOnKeyboardFrameChanged = true
scrollsToLastItemOnKeyboardBeginsEditing = truemessageInputBar.inputTextView.tintColor = .systemBlue
messageInputBar.sendButton.setTitleColor(.systemTeal, for: .normal)messageInputBar.delegate = self
messagesCollectionView.messagesDataSource = self
messagesCollectionView.messagesLayoutDelegate = self
messagesCollectionView.messagesDisplayDelegate = selfloadChat()
That’s it! Run it and see it for yourself. Here is how it’s working for me:
Here is the full code:
https://gist.github.com/thechaudharysab/36b4802047b5c504033792fd75dcc9fd
Enhance it!
Group Chat
I haven’t tested it but the same idea works for a group chat app. All you have to do is to add a user ID in users array under chat and change this if-condition in loadChat() function to something like this:
if ((chat?.users.contains(self.user2UID ?? "ID Not Found")) == true) && ((chat?.users.contains(self.user3UID ?? "ID Not Found")) == true) { {Of course, that’s not the optimized way of doing it but just to give you the idea that you can fetch the thread that contains IDs of all the users and that’s a group.
Sending Media (Images and Videos)
Again not tested on this code but the overall structure is the same. You just need to make changes in Message.swift’s MessageType and add an additional delegate UIImagePickerControllerDelegate this example might help https://github.com/MessageKit/MessageKit/blob/master/Example/Sources/View%20Controllers/BasicExampleViewController.swift
I might expand this same tutorial for media types and location etc.
As always if you find this helpful share and press the 👏🏻 button so that others can find it too. If you see a typo feel free to highlight it or if you’re stuck drop a comment and I’ll try my best to help you.

All my tutorials are free but if you feel like supporting you can buymeacoffee.com/chaudhrytalha
Happy Coding 👨🏻💻
